Do-It-Yourself Pergola
March 14, 2018
How To Build A Wood Pergola (Without a Saw!!!)
A pergola is a great way to enjoy your backyard and give your outdoor space some added design. If you need a custom pergola in Vista, CA visit this page here. We service San Diego County and surrounding areas.
If your yard permits you might consider a Costco pergola. You can get a basic Costco pergola kit for around $1000, or if you’re handy enough and have the time, you might just build one yourself. Here’s a step-by-step guide.
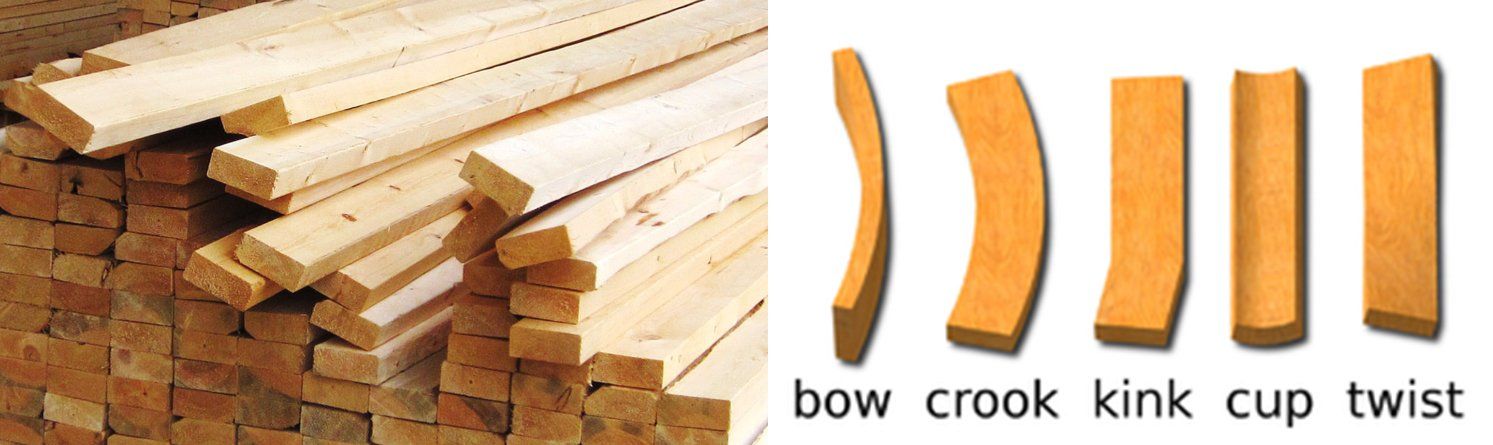
When choosing wood for your Do-it-Yourself Pergola make sure your boards are as straight as possible, avoiding boards with the following problems.
What You’ll Need:
- 4 – 4x4x10 – pressure treated posts
- 2 – 2x6x10 – common wood, ex. Douglas Fir
- 8 – 2x4x10 – common wood, ex Douglas Fir (at least 8, more if sufficient shade is required)
- 4 – Bags of Concrete
- 4″ Lag screws and washers (4)
- 3″ exterior screws
- Exterior paint
- Shovel
- Bucket of Water
Directions:
- Measure where to put your pressure treated posts first. They will be 8 feet apart on center.
- Dig a 12 inch square hole around the middle of where your post will be set. Dig a minimum of 18 inches deep.
- Center and level post on both verticals. Make sure all posts have the same vertical height from the ground up, or very close.
- Follow directions on cement bag for water/mix ratio. Pour cement and water into hole and around post. Poke a few holes in the cement to be sure the water drains properly. Hold post until it is sturdy enough to stand on its own.
- Decide what kind of cut ends or corbels you want for the cross beams. Click here for some examples. For this project we are just using the straight-cut ends from the factory cuts. No saws needed!
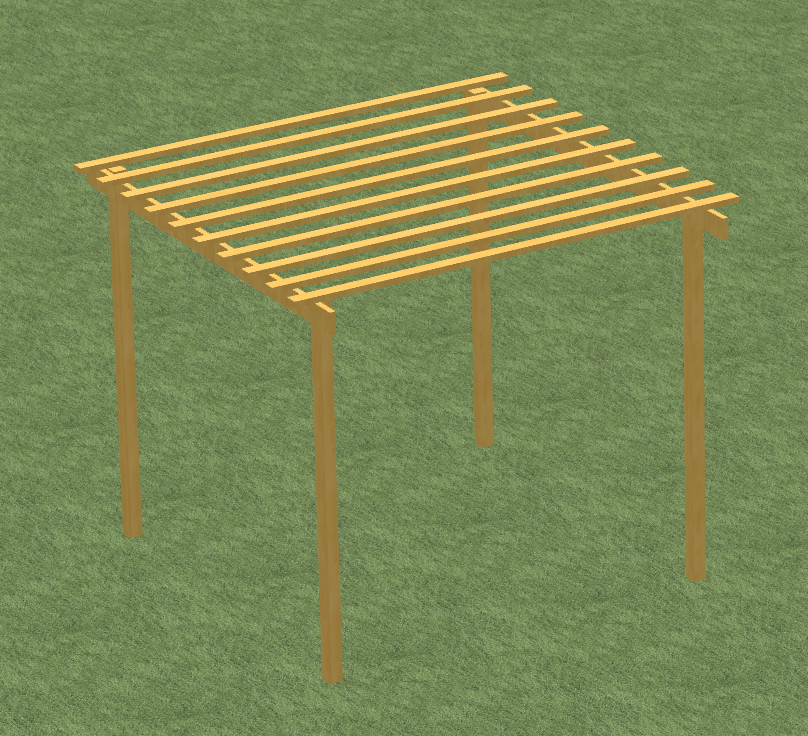
- When the cement has dried COMPLETELY and the posts are sturdy, you are ready to fasten the beams. You’ll want to install 2 parallel beams so you can set the next pieces on top of those. Use another pair of hands to help you hold each beam up and into place. There should be about 8″ of hangover on each side. Use a level and fasten with a lag screw and washer into the 4×4.
- Now evenly measure and space out the next row of wood pieces for the roof. The more wood you use, the more shade your pergola will provide. Fasten wood with 3″ exterior screws. See image above.
- If all has went well, you should be out of the building phase, and into finishing. Paint your pergola with a primer first and 2 coats of paint for maximum protection from the elements. Allow proper drying to occur between each coat.
The Biggest Fire-Rating Hack For California Property Owners in Years (And Almost Nobody Is Using It Yet)
Turning Vision into Reality: The ADU that Became a Business Studio